Editing a video with YouTube is a surprisingly easy task—ironically, the trickiest part may be getting started.
Getting started editing a video
YouTube’s home page doesn’t point the way to the editor, but you can get there directly at http://www.youtube.com/editor. The other initial stumbling back to getting started editing a video is that the search box defaults to just your own videos. The toolbar that lets you select the area of YouTube to search looks like this:
If you only want to edit your own videos, terrific, but recognize that if you choose the “CC” icon you can edit anything available on YouTube under the Creative Commons license. If you expect the search function to automatically search all of YouTube, you may be surprised by the need to change your selection here.
Editing a video lets you trim and combine
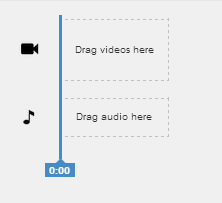
Once you get started editing a video on YouTube, the process is about as intuitive as you’d expect from YouTube. You can use a clip from a video by dragging it into position in this tool:
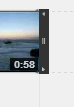
Drag the videos in side by side to string them together. Once you’ve done that, you can edit the clips themselves by dragging the left border of the clip to edit out the beginning, and the right border of the clip to edit out the end. Here’s what that border looks like:
This means the only way to take out a middle bit of a video is to put it in the editor twice–have the first copy of the video play until the part you want to remove, and then have the second part resume after that part. It might be a little tedious—and make you long for a professional video editor—but, given it’s a free tool, it seems pretty reasonable that editing a video on YouTube might have a few quirks or complications.
Editing a video has many uses
In some sense editing a video is the bit of polish that makes the difference between the most rough and tumble videos and videos that let the viewer know that you’ve put in a little time to holding their interest and presenting a professional package. Some of the ways you can use it include:
Creating shortened version of a video for a blog post. If you don’t want to pull your audience away from your writing for too long—if the blog post isn’t mainly a showcase for the video—this may be useful. We used YouTube’s editor to present a short clip to go with a recent post.
Splicing something in the news with commentary. If your organization has a statement to make about the president’s recent speech or a bit of video that’s gone viral, if it’s available under a Creative Commons license you can take the bit that you want to present and add your commentary while keeping your video short.
Enabling your organization’s state affiliates, local chapters, individual houses of worship, etc., to use a common video but with their own custom branding and call to action.
Editing a Google Hangout for people who may have missed a meeting.
While there’s no substitute for having a professional behind the camera and interviewing subjects, editing lets you take out camera shake and slow points in interviews. You’ll want to splice in something else to make the transition, like a still photograph or b-roll event footage. YouTube also provides some transitions options, which come up if you click the two triangles on the toolbar. Some are pretty wacky, but a simple crossfade will soften a harsh transition.
Have you tried editing a video with YouTube’s tool? Let us know how it went in the comments!
If MiniMatters can help you with business video, fundraising video, association video, or other video production needs, we’d love to provide an estimate through our online form, talk with you at 301-339-0339, or communicate via email at [email protected]. We serve associations, foundations, nonprofits, and businesses primarily in Washington, DC, Maryland, and northern Virginia.
 Drag the videos in side by side to string them together. Once you’ve done that, you can edit the clips themselves by dragging the left border of the clip to edit out the beginning, and the right border of the clip to edit out the end. Here’s what that border looks like:
 This means the only way to take out a middle bit of a video is to put it in the editor twice–have the first copy of the video play until the part you want to remove, and then have the second part resume after that part. It might be a little tedious—and make you long for a professional video editor—but, given it’s a free tool, it seems pretty reasonable that editing a video on YouTube might have a few quirks or complications.
 If MiniMatters can help you with business video, fundraising video, association video, or other video production needs, we’d love to provide an estimate through our online form, talk with you at 301-339-0339, or communicate via email at [email protected]. We serve associations, foundations, nonprofits, and businesses primarily in Washington, DC, Maryland, and northern Virginia.